What Is Low-Slope Metal Roofing? Best Profiles for Low-Slope Roofs
Choosing the wrong profile for a low-slope standing seam metal roof can be detrimental to the system. Discover what is considered low-slope, why choosing the right profile matters, and what profiles we recommend for low-slope systems.
When you’re looking to install a standing seam metal roof on your property, there are several important design considerations to keep in mind.
One of the most crucial building/home factors that will affect your product choice(s) is the slope of the roof.
You might be asking yourself how slope can make that much of a difference. However, it’s a critical component that — if ignored and not considered during the panel profile selection stage — can affect the overall roof performance.
One of our most significant priorities at Sheffield Metals is to make sure our customers are using the right system and profile based on the property’s specific attributes. That’s why we believe it’s important to share information about low-slope roof systems and what profiles we recommend to accommodate low-slope projects.
In this article, we’ll discuss:
- What is considered a low slope roof?
- How to measure roof slope.
- Hydrostatic vs. hydrokinetic systems.
- Why choosing the right profile matters.
- Our profile recommendations for low-slope roofs.
What Is a Low-Slope Roof?
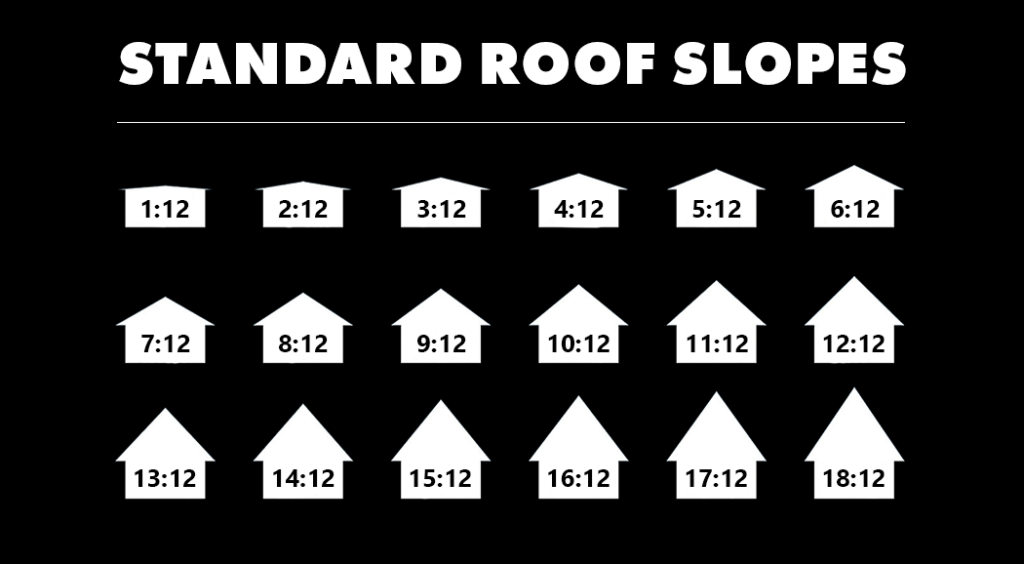
A low-slope roof is defined in the industry as a roof that has a pitch equal to 3/12 or less. At Sheffield Metals, we also recognize low slopes as 3/12 and below. Determining which panel is the right choice for the slope on your project will depend on the manufacturer’s minimum slope factor for that specific panel profile.
How to Determine the Slope of a Roof
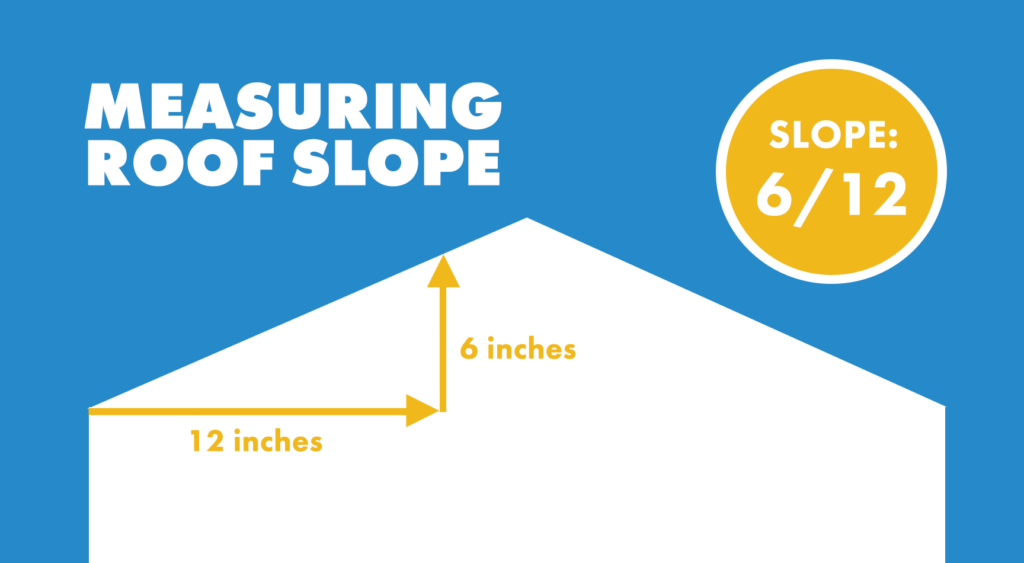
If you’re unsure of what the slope/pitch of a roof structure is, it’s relatively easy to measure. To determine your roof pitch, you’ll need to measure how many inches your roof rises over every 12-inch run.
Using a measuring device, move inward on the flat roof plane (parallel to the ground) 12 inches. Once you reach 12 inches, mark it, and then measure how far the roof rises perpendicular to the ground. For example, if your roof rose 8 inches for every 12 inches, the roof pitch is 8/12.
If you can’t reach your roof or feel uncomfortable climbing a ladder, don’t hesitate to ask your roofing contractor to do the measurement for you.
Testing of Low-Slope Metal Roofing Systems
Low-slope and steep-slope roofing systems have different industry-standard testing requirements. Low-slope metal roof systems are tested to ASTM E2140 standards, a water penetration test evaluating the resistance of roof panels’ vertical seams.
During this test, the roof panel system is completely submerged under six inches of water for approximately six hours. Static water pressure is then applied to the outside face of the roof panel, which tests the roof’s ability as a water barrier. This method is intended to evaluate the water barrier (not water-shedding) of roof systems with a pitch below 3/12.
Hydrokinetic vs. Hydrostatic Roof Systems
When researching low and steep-slope roofs, you might come across the terms “hydrokinetic” and “hydrostatic” to describe a roof system. Here are the definitions of these two terms and how it applies to the pitch or slope of a roof:
- Hydrokinetic – When a roof system is hydrokinetic, it means that water is quickly shedding off the roof plane. Hydrokinetic systems are typically any roof pitch above a 3/12, making it a steep-slope roof.
- Hydrostatic – Hydrostatic roof systems refer to panel systems that are 3/12 or less, which are designed to hold water and drain slower. Hydrostatic systems have a higher potential to become submerged, which is why it’s critical to have better protection against water intrusion. That’s why we recommend sealant in the panel seams and an ice and water shield synthetic underlayment for low-slope systems under a 2/12 pitch.
Why It’s Important to Choose the Right Profile for a Low-Slope Roof
Many different standing seam roof profiles look similar to one another on the surface, such as a snap-lock, mechanical lock, or fastener flange systems. However, they are not all suitable for low-slope situations.
So why does choosing the right profile based on the slope make a difference?
With a roof system, you obviously want the “look” you’re going for, but it’s all about shedding water and making sure the profile chosen doesn’t get overrun with water that has nowhere to drain. As you probably guessed, lower-sloped systems don’t shed water as quickly as a steep-slope roof. This means that low-slope roofs are more susceptible to leaking due to water backing up or not shedding from the roofing system fast enough, particularly in a driving rain storm. Springing a leak is the number one metal roofing problem that can cause significant damage and lead to high repair costs. That’s why it’s critical to choose a profile where the seam provides the extra weather-tightness required in a lower slope system.
On top of choosing the right profile, we want to reiterate the importance of picking the proper underlayment to go along with the profile. One of the best choices for low-slope roofs is a self-adhering high-temperature/ice and water shield synthetic underlayment. This is especially true when compared to using a mechanically attached synthetic or asphalt felt paper underlayment in a low-slope system. A self-adhering ice and water shield synthetic underlayment will ensure that if water does somehow pass through the roof panels, it will not leak through into the property.
Best Profiles for Low-Slope Applications
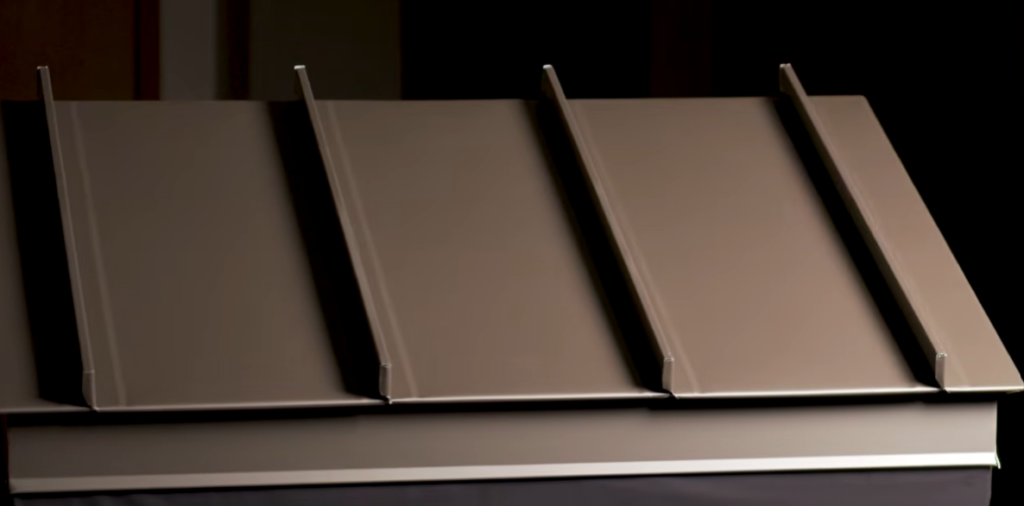
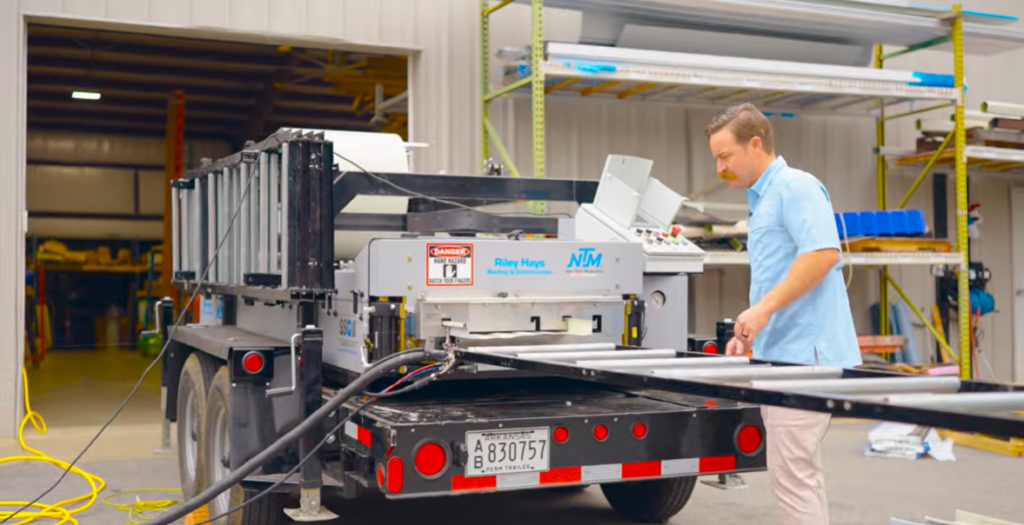
The best profiles to use for low-slope projects will be mechanically-locked metal roof systems. Mechanically seamed panels are rollformed with specific edges that line up with each other. Once the two panels are engaged, a hand or robotic seamer (check out our friends at Quality Roof Seamers) is used to bend the edges and lock the panels together.
There are two different versions of mechanical seams:
- Single-lock (one fold, 90-degree seam)
- Double-lock (two folds, 180-degree seam)
For low-slope systems, double-lock mechanically seamed profiles are going to provide the most protection and extra weather-tightness. Plus, there is less of a chance for panels to come unseamed, which is important in low-slope situations and in locations where freezing and thawing (and therefore expansion and contraction) take place. For example, snap-lock profiles are more susceptible to disengaging due to the thermal movement of built-up snow and ice.
Surprisingly, a lot of the decision comes down to aesthetics. If you want a metal roof and it’s a low-sloping roof, you should go with a mechanical lock profile. Keep in mind that because a mechanically locked system requires seaming, it might not look as clean as a snap-lock profile. However, a mechanical profile will perform better, which is more important.
Luckily, you often can’t see low-sloped roofs from the ground, so you might not notice the slight imperfections of a mechanical system. Or, if you have a roof with multiple both low and steep slopes, you can also consider using two different profiles/systems. For reference, an entirely mechanically seamed roof is going to be on the higher price end because it’s a labor-intensive installation process.
Let’s go through a few examples of low-slope profile options.
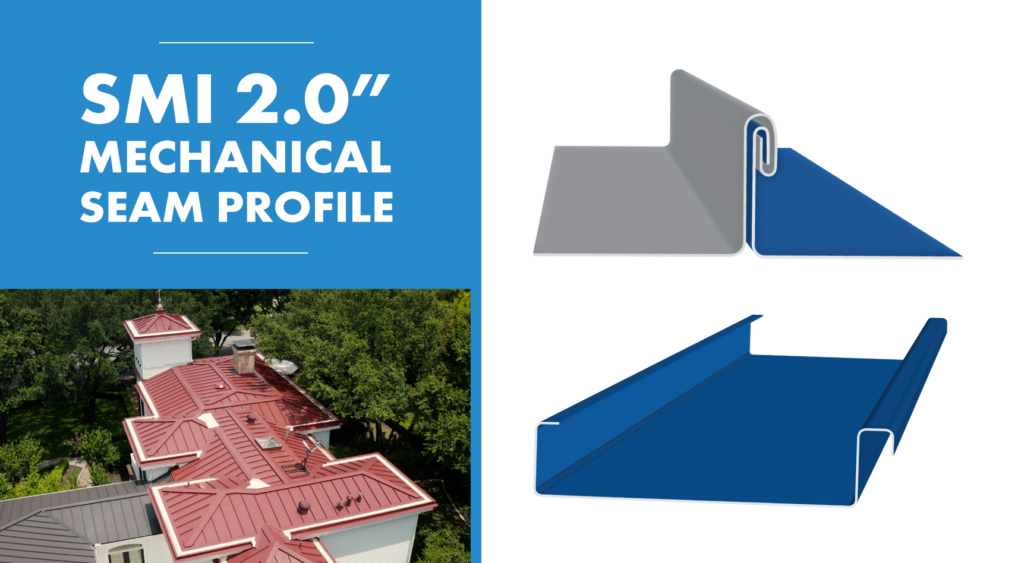
#1: Sheffield Metals 2.0″ Mechanical Seam
- Panel type: Standing seam
- Panel seam: Mechanical
- Panel width: 18” (steel) | 16” (aluminum)
- Seam height: 2.0”
- Panel material: 22 to 24-gauge min steel | .040 aluminum
- Panel surface: Smooth | Embossed optional
- Panel clip: Required per engineering
- Minimum slope: .5/12 for steel (based on project conditions and inseam sealant application) | 2/12 for aluminum
- Substrate: Open framing, plywood, b-deck, b-deck w/ ISO
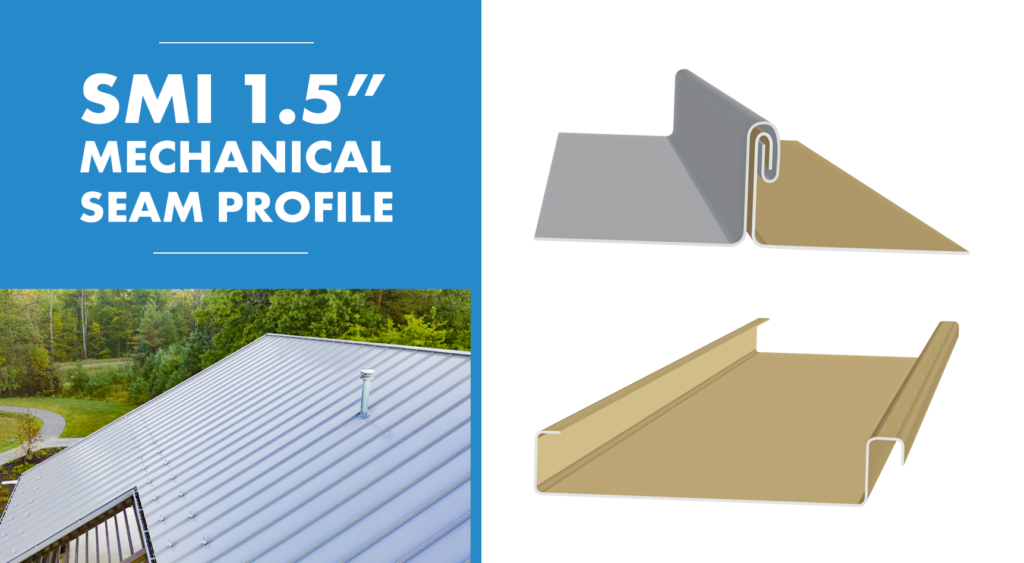
#2: Sheffield Metals 1.5″ Mechanical Seam
- Panel type: Standing seam
- Panel seam: Mechanical
- Panel width: 16”
- Seam height: 1.5”
- Panel material: 22 to 24-gauge min steel | .032 to .040 aluminum
- Panel surface: Smooth | Embossed optional
- Panel clip: Required per engineering
- Minimum slope: 2/12 | 1/12 (steel only – based on project conditions and inseam sealant application)
- Substrate: Plywood, b-deck, b-deck w/ ISO
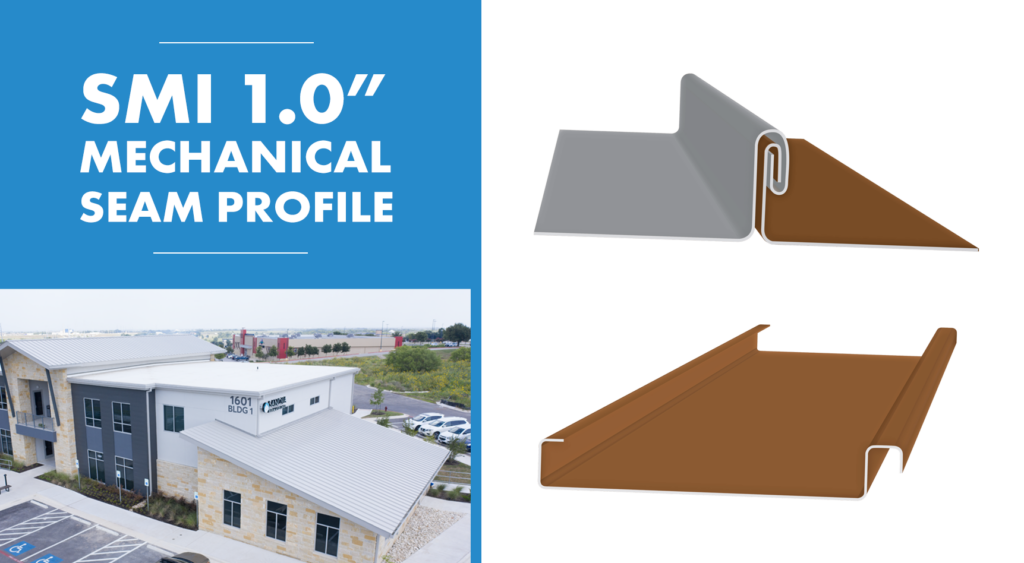
#3: Sheffield Metals 1.0″ Mechanical Seam
- Panel type: Standing seam
- Panel seam: Mechanical
- Panel width: 17”
- Seam height: 1.0”
- Panel material: 22 to 24-gauge min steel
- Panel surface: Smooth | Embossed optional
- Minimum slope: 3/12
- Note: The SMI 1.0” Mechanical Seam is NOT an engineered profile.
Final Thoughts on Low-Slope Metal Roofing
The bottom line is that you want to install a standing seam metal roof profile that will provide the most protection for your low-slope project. That’s why your best bet will be to use some variation of a mechanically seamed metal roof system, specifically a double-lock profile.
Remember, if you don’t know what your roof pitch/slope is or what profile is best to use for your slope, ask your contractor so they can assist you.
For over 20 years, Sheffield Metals has assisted hundreds of contractors and property owners in choosing and installing the best roofing profile based on the project’s slope and other design considerations. Best of all, we have engineering on numerous standing seam metal roof profiles that are a good fit for low-slope roofs.
Contact one of our helpful metal roofing specialists today to discuss your roofing project!